

Oh, it's hard to imagine that in one weekend we clean up the Thanksgiving feast, pull down the Fall decorations and get ready for Christmas! I didn't really. What Fall stuff we have (not a lot) is still up. But I do have the December holidays on the brain. I'm excited! We gathered with my family last night and sat around my sister's Christmas tree. It was the first Advent Sunday and we'll get together each Sunday until Christmas for singing and eating sweets.

So it seemed like the right thing to whip up some snowflake t-shirts for the girls! I had figured out this snowflake pattern to make gift toppers and then thought they were begging to be on some apparel. The bits of tinsel in this yarn make it especially seasonal and perfect for young girls! Mine love a bit of sparkle!

They were very excited about these shirts, which is always a big payoff for me. I made Scarlett's last night and showed Audrey and she wanted to wear hers today! Luckily this little project is fast enough you could pull it together in the time in takes to eat breakfast, if you happen to have a t-shirt on hand as I did.

So we have a white snowflake for Audrey and a hot pink one for Scarlett, to match her hot pink skirt.

Scarlett's shirt was a size or so too big for her so I shortened the sleeves and the bodice by adding a bit of shirring with some elastic sewn to the wrong sides. I don't have a how-to for it but I'm sure they can be found--I just pulled the elastic while zigzagging to gather the fabric. It's a cute solution. Suits her too to have the extra little flourish.

The shirts did the trick: the girls are singing Christmas carols. "Rudolph the Red-Nosed Reindeer" includes actions:

If you are interested in the pattern and the tutorial for this snowflake click to read more.
SPARKLE SNOWFLAKE APPLIQUE TUTORIAL
You'll need:
- 1 skein Red Heart Shimmer yarn in a color of your choice (or another worsted weight or "Category 4" yarn)
- Size "I" crochet hook (though "J" or "H" would work fine--sizing isn't really an issue!)
Abbreviations:
ch: chain
sl st: slip stitch
sc: single crochet
dc: double crochet
Special stitch: Trefoil (chain 3, slip stitch, chain 5, slip stitch, chain 3, slip stitch all into the same stitch)

To make: Chain 4

Join with a slip stitch into the first chain...

...to form a loop.

Chain 2 (counts as first double crochet)

Double crochet into the loop (you now have 2 dc).

Double crochet into the loop ten more times (for a total of 12 dc).

Join with a slip stitch into the top of the beginning chain-2.

Chain 2 (counts as the first dc).

Double crochet into the same stitch (the joining stitch).

Chain 3.

*Skip the next double crochet. Make 3 double crochet into the next double crochet stitch. Chain 3.**
Repeat from * to ** 4 more times.

Skip the next dc and dc in the base of the initial ch-2.

Join with a slip stitch in the top of the initial ch-2. (You will have six sets of 3 dc and 6 ch-3 spaces)

Trefoil (chain 3...

...slip stitch...

...chain 5...
...slip stitch into the same stitch...

...chain 3 and slip stitch into the same stitch.)

Chain 2.

Double crochet into the same stitch (base of the ch-2, where the trefoil is also located).

Trefoil (chain 3...

...slip stitch into the top of the last dc...

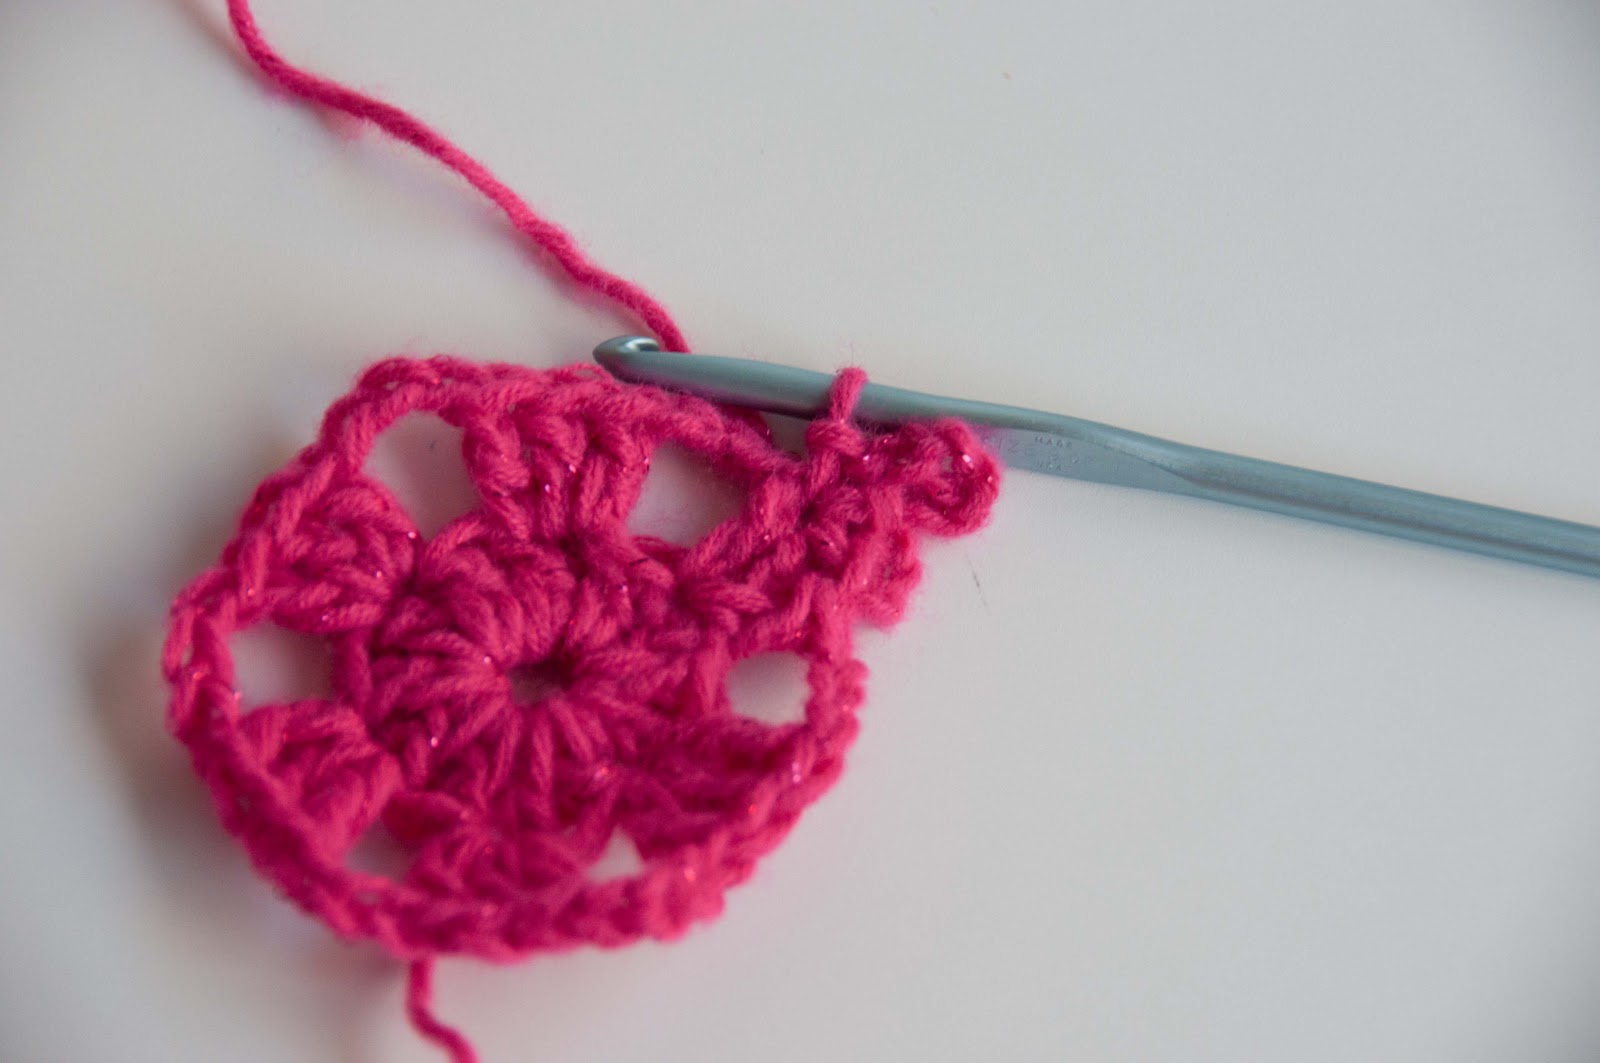
...like so...and finish trefoil with the ch5, sl st, ch 3, sl st).

(The finished trefoil looks like the photo above.)

Chain 2 and slip stitch into the base of the last double crochet. Trefoil at the base, working into the same hole as the first trefoil. (You will have a trefoil at the base, on the right, a set of ch-2 dc ch-2 with a trefoil in at the top in the center, and then a trefoil at the base on the left forming one "arm" of the snowflake.)

Work 2 single crochet into the ch-3 space.

Skip the next dc and slip stitch into the next dc. (You have worked your sl st in the middle stitch of the 3 dc stitches).
Now, *trefoil, chain 2. double crochet, trefoil, chain 2, sl st in base of dc, trefoil, 2 single crochet into the next ch-3 space, skip the next dc and slip stitch into the next dc** to form the next arm of the snowflake.

Repeat four more times ending with the 2 sc in the last ch-3 space.

Slip stitch into the base of the first trefoil to join.

There is your snowflake! Now weave in the ends and you are ready to applique this to a t-shirt or something else, or use as a gift topper.

Make more than one. After you make the first one you'll find that the rest are easy!

To sew onto a t-shirt use a straight needle and sewing thread. Cut a good length of thread--maybe 24" inches or so to start. Thread your needle and knot both ends so you have doubled your thread for stitching. Position your snowflake where you would like it and holding it in place, push your needle through from the wrong side until you reach the knot. Now stitch being sure to secure the center and all of the "arms" of the snowflake. I try and stitch directly through the yarn and hide my thread by using small stitches on the right side and longer on the back side. You can see how this looks in the photo above of the wrong side of the shirt. Nothing too fancy or precise here!


17 comments:
How adorable! You can tell your darings love their crocheted snowflake T-shirts.
These are wonderful and look so soft and cozy! Alas, I will not be making one because for me, yarn arts might as well be rocket science. (Such a fantastic quick trick for sizing down a tee, too!)
Lovely. I am working on a snowflake project of my own...but I am not sure it will even compare. The crocheted texture make them splendid-looking!
These are wonderful! Might I ask where you got such sturdy looking, and brightly colored tshirts?
Thanks!
kat
And we are on the same page again! I just did a search for a crochet snowflake pattern and of course, I'd choose you over Martha any day. :) Can't believe you just posted this yesterday!
@Anonymous: I bought these t-shirts at Target a year or so ago with other plans for them but was happy to still have them on hand for the snowflakes!
I'm a very beginning crocheter (is that a word?), and I really wanna make one of these! I'm a bit intimated by the Trefoil, but I will give it a go. Thanks so much for the tutorial. I definitely couldn't attempt without the pics! I hope to be as good as you some day and crochet my daughter a dress! Someday.....
totally making this! Love it and thank you:)
Oh I cannot wait to try this!!! So cute! Love the idea on using the elastic to shir up the arms and sides of a tshirt to make it fit better! Thank you! You have the best tutorials!!!! :O) Hugs! Bari Jo
I'm totally doing this! Thanks! PS - Already made the snowflake itself...but now I can show-off with my kiddos clothing! hehaha Thanks so much for sharing!!!
I love to visit your blog for inspiration! I think this will be a perfect shirt to make for my own daughters, as well as for my goddaughter!
Thank you so much for your faithful posts!
Angel - one sewing mommie!
oh these are just lovely! I never thought to add crochet as an applique~ too cute!
I loved your idea when I seen it but of course I did not have the yarn or the shirt on hand so my daughter and I went out last night and got them both. The Joann's I was at only had one color of the shimmer yarn it was red, in fact I am assuming it was the red heart shimmer however, the label was not on this skein and since it was the only one I bought it anyway.
So, today I made it! I love it. I still have to attach it to her shirt. Thanks so much for sharing this. Denise
hola, desde méxico, me gustaron mucho estos copos de nieve.
hi! from mexico, i really liked this snow flakes!!!
stumbled here. what a great find! i have a grand daughter and several girls in my class that would LOVE a tshirt like this. thanks for sharing!
Love these and have made several for friends and family already. Thanks for faithfully sharing your creative ideas! I can't imagine where you find the time, as I also have 3 small children and sometimes struggle to just get my teeth brushed. :)
Post a Comment