In this how-to series we could move right on from single crochet to the other stitches (double crochet, half double crochet and triple crochet) but I'm pausing to talk about "seaming" because if you want to make anything other than washcloths or rectangular scarves or afghans (which are all good) you're going to need to seam some pieces together. Seaming is a good skill to have and it can be the difference between a cute sweater looking handmade instead of homemade. I am going to share two different methods. The first is the invisible mattress stitch, which works equally well for knitting or crochet by the way, and the second seaming method uses a single crochet stitch.
Click to view the full tutorial.
SEAMING WITH THE MATTRESS STITCH:
You will need a tapestry needle to do the seaming, which is a large blunt needle and a big eye for threading the yarn. I am going to use a contrasting yarn for this tutorial but you'll want to use the same yarn you used for your project so it blends in.
The mattress stitch is so fabulous because it's virtually invisible if you line up the stitches correctly. If your pattern calls for "blocking" the work you will typically want to do that before seaming so the pieces all lie flat. You start with the two pieces you are joining right side up, facing you. (Crochet is often reversible, so if either side would work form a fit/pattern perspective and you don't see a visible difference, just pick one!)
Most often you will be seaming pieces of the same length, or number of rows, so each row should line up as you go, but it's not a bad idea to use safety pins or stitch markers to line up the seam at top, bottom and a few places in between. That way you'll be sure you don't end up with a part of the seam stretched to fit.
To start, cut a length of yarn about twice the length of your seam and thread your tapestry needle. No knots.
Working with the piece on the right, insert the needle from the wrong side to the right side (back to the front of the piece) in the lowermost left stitch and pull the yarn through until you have a tail of about three or four inches for weaving in later.
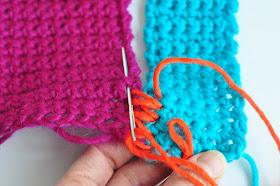
Now insert the needle from back to front of the lefthand piece in the mirror stitch (the lowermost right corner). The key to working this seam perfectly is to mirror your stitches--working your needles in and out of the stitches on each piece in exactly the same way.
So you will now insert your needle through the piece on the right in that same lowermost stitch. Push the needle under to the back side and out the next stitch up to the front side.
Do the same (mirroring) on the left side: insert the needle in the lowermost stitch from the front to the back, up one stitch and out through the front again.
You can keep these stitches loose right now--you'll pull them tight later.

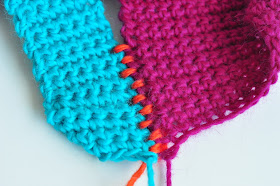
Continue working up your seam in this way, back and forth mirroring the same stitches on the right and left, working up one stitch (or row) at a time.
Every couple inches you will want to pause and pull your working yarn up in the direction of the seam to tighten the stitch.
The yarn should glide through the stitches pretty easily--be careful not to pull it all the way out.
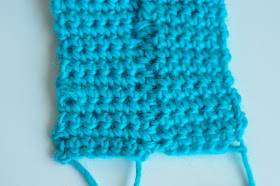
Look how beautiful and "invisible" it looks after the seam is pulled tight! It's nice and flat on the outside.
Here it is on the reverse--a bit of a bump, but neat.
When you have finished stitching your mattress seam you then cut your yarn, leaving a tail and weave in the ends. (I'll post a tutorial on weaving in later.)
That is the mattress stitch! I love it!
But now I will show you seaming with a single crochet stitch, which can't be beat for it's simplicity, but it is not as invisible.
SEAMING WITH THE SINGLE CROCHET:
Unlike the mattress stitch, this seam is created by working with your pieces right sides together. Line up the two pieces to be seamed and use safety pins or stitch markers to hold them together while you work.
Use a crochet hook of the same size as the one used in your pattern, and the same yarn (I'm using a contrasting yarn for ease of viewing). You can leave the yarn attached to the skein.
You are going to work a row of single crochet through the two pieces you are seaming by starting in the furthest stitches to the right. Tie a slip knot on your hook and insert your hook through the first stitch in each of the pieces you are seaming...
...and work a single crochet through the two pieces just as you would if you were working into a row of single crochet.
Repeat the single crochet stitch working up the seam in each subsequent stitch, or hole. It doesn't really matter into which holes you are working as long as you do it consistently so the single crochet stitches are spaced equally and they're all equally close to the edge of the seam. That way your seam will be straight.
This is how it will look on the wrong side of the seam.
The right side will look like this, however, if you are using the same yarn it will blend in.
Here is what the single crochet seam looks like if you are using the same yarn to seam. Wrong side:
And right side:
When you are finished seaming cut yoru yarn leaving a few inches to weave in.
And there you have it. Two ways to seam your crochet work.
Next up is the double crochet stitch.
How-to tutorials, patterns, giveaways, reviews and interviews to make certain you are smitten.
Click on the "HOH in Crochet" label or button to view all the content in this series.
Here's a quick list of all the "How to Crochet" posts:
How to Crochet 1: The Slip Knot
How to Crochet 2: Holding the Yarn
How to Crochet 3: The Chain Stitch
How to Crochet 4: The Single Crochet
How to Crochet 5: Seaming Your Work
How to Crochet 6: The Double Crochet
How to Crochet 7: Weaving in the Ends
How to Crochet 8: The Half Double Crochet
How to Crochet 9: The Triple Crochet
How to Crochet 10: Working in the Round
How to Crochet 11: Understanding Gauge


You are so awesome for doing all of this!
ReplyDeleteAwesome! I never knew how to do this properly. Thanks for sharing- especially with different colored yarn first and with matching yarn.
ReplyDeleteI am in love with the crochet lace featured in your How to Crochet banner. Is there a way you can share that pattern with us? Would love to make this for an edging on a T-shirt for my little girl. Thanks so much!
ReplyDeleteThis was great - love the mattress stitch, I'm going to try that next. Thanks for thinking to use all the different colors - it makes it so much easier to see exactly what you're talking about.
ReplyDeletethank you for the great tips! love your work!
ReplyDeleteOMG! This is so going to help me create a "monster" afghan I have in the works. Have never seen the mattress stitch for joining before. Thank you, thank you, thank you!!!!!
ReplyDeleteI have had the pieces of a cute baby sweater made up for about a year but I wasn't sure how to put it together. I guess I didn't think that far ahead? You've helped me "put the pieces together". I am excited to see it finished.
ReplyDeleteI love, love, love you blog!
I was wondering if this post were too boring so I'm so happy to hear you find it useful! Thanks for yoru comments.
ReplyDeleteThis was GREAT!!! I love the mattress stitch! I've used what I thought was called a 'ladder stitch' to close up stuffed toys etc but now I know it is the mattress stitch! I never would have thought to use it for seaming crochet! Thank you for this great tutorial - I am loving what you are taking the time to share! I have friends who want to learn to crochet and I am such a newbie myself - these posts will be wonderful for them!!! I sure appreciate all your hard work! I'm off to vote again for you! :O)
ReplyDeleteAlways important basic information and you've shared terrific photos to make it easy to understand!
ReplyDeleteI love,love,love your blog! Thank you for the helpful tips!!!!!
ReplyDeletehttp://www.loganmakesamess.com/
@Anonymous: I do plan to share the pattern for the crochet pictured in my "How to..." and "HOH" banners. It's a scarf pattern coming up--probably next week. Thanks for your interest.
ReplyDeleteI'm loving your how to crochet series. Reviewing the basics is a must at times for me. We are featuring crochet this whole week on our blog. Today is a infinity scarf tutorial - much like your childs cowl.
ReplyDeletehttp://www.sistersplayinghouse.blogspot.com/2012/03/crochet-week-chunky-infinity-scarf-free.html
Thank you for that mattress stitch tut! Almost a full year of crocheting and swearing there has to be a better way than single crochet to seam! I think I will literally sleep better tonight. :)
ReplyDeleteThanks for this seaming tutorial. If I wanted to use buttons (2) instead of seaming, can you help me with instructions on how to do that? Thank you!
ReplyDelete@Cindy: To use buttons your pattern needs to allow for some overlap and you need to crochet a button hole. See this tutorial for one example: http://www.aestheticnest.com/2012/03/hoh-in-crochet-girls-felted-satchel.html
ReplyDeleteAhh! This was enlightening. I knew some of it, but not properly. I am learning so much from this series. Thanks Anneliese.
ReplyDeleteThank you for the button tutorial link, Anneliese!
ReplyDeleteThanks! Great tutorial. Just what I needed.
ReplyDeleteWhat a wonderful web page you have. I enjoyed reading everything. AND you solved the age old problem of how to put to pieces together and no one knows where the seams are when you are finished. Fantastic. Thank you so much for sharing your expertise. Jeri Atkin
ReplyDelete