Rain is fun to splash around in, brings green and flowers, and, when the sun finally comes out...rainbows. Lots of things to smile about!
A year ago or so Audrey asked for a rainbow skirt so I've had it in the back of my mind for a while, unsure of how to go about it as it didn't sound like my favorite kind of project. Then KoJo Designs contacted me about their great Color My Summer series with Delia Creates and I thought I'd sign up for ROY G BIV (little did I know this is the common way of describing the hue order in a rainbow) and push myself to do the skirt. I love a challenge! Thank you Kristin and Jordan!
This skirt was fun to make. I think it looks darling on Audrey (so great with her Venetian necklace!). And for the first time in a week the clouds parted just in time for her to twirl around in it with her cousin (isn't he a cutie?) while I took pictures.
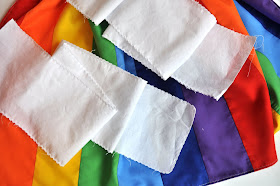
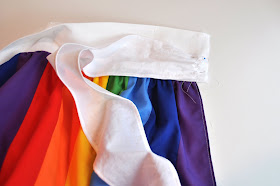
I think the color spectrum looks even better with some white to set it off so I designed this wrap-around skirt with a white waistband and a wide white sash almost as long as the skirt.
It's fully lined, so the inside is pretty too, and it's a fairly easy sewing project. Best of all, the instructions would work for any sized girl. Rainbow skirts for everyone! Hello summer!
See the post on KoJo designs and click for the tutorial. (And think how fun your leftover stash will look!)
RAINBOW WRAP SKIRT TUTORIAL
SIZING AND PATTERN WORKSHEET:
I've designed this skirt with three gathered rainbows--one for the back and one for the front and one again for the front wrap. There are 7 panels in our rainbow: ROYGBIV. We'll figure out the dimensions of each rainbow panel and construct the skirt from there. This skirt is cut-to-fit, so the dimensions of your fabric pieces depend on the measurements of your child (or yourself! This would work for you too!). Before getting started take the following measurements. (It's a good idea to pull out some paper and create a little worksheet to figure it all out before cutting.)
- Measure your rainbow girl's waist ("W"):_____ (my child measures 20.5")
- Then measure from her waist to 2" below her knee. Add 1" to this for seam allowances and this gives you the length ("L"):______ (my child measures 15" plus 1"=16" for L)
- Panel Width ("PW")" is equal to W/7+.5" for .25" seam allowances:_____ (so for my skirt I took W of 20.5 but I rounded to 21, feel free to do that as a little extra fullness is great, so I got 3, and then added .5" for a total PW of 3.5") So your panel size will be PWxL. (Mine are 3.5"x16")
- Your waistband sections (there are three of them) will be W/2+1" long and 5" high. (Mine are 10.25"+1"=11.25"x5")
- Your tie pieces (there are two of them) will be L+10"x5" high.
- Your skirt lining will be cut in three pieces, each W+1" x L, BUT, wait until your skirt is pieced together to double check the measurement in case after sewing the dimensions are slightly different (nobody's perfect).
- Seven colors of cotton or cotton/poly broadcloth: Red, Orange, Yellow, Green, Blue, Indigo, Violet (ROY G BIV) large enough to cut three panels (PWxL) out of each. You can very likely cut these perpindicular to the selvage because yoru fabric should be wide enough. If that is the case 1/4 yard of each may be enough. I bought 1/2 yard of each because it was on sale and I thought it would be fun to have some extra (I have two other daughters afterall!).
- White cotton broadcloth for waistband (3 pieces), ties (2 pieces) and lining (3 pieces). (See worksheet above to estimate your dimensions). I purchased 1 3/4 yards.
- One button for inside closure (it doesn't show).
- A bit of interfacing for the waistband.
- Coordinating thread. (I used white).
CUTTING THE PIECES:
- Cut 3 panel pieces PWxL of each of your seven ROYGBIV colors. (See worksheet above)
- Cut 3 waistband pieces out of the white W/2+1"x5". (See worksheet above)
- Cut 2 tie pieces L+10"x5"
- (We'll cut the skirt lining pieces later...)
SEWING THE SKIRT:
1. Lay out your skirt panels in the ROYGBIV order, so you should have ROYGBIVROYGBIVROYGBIV and start pinning the long sides of the panels together, right sides together (if there is a right side to your fabric). Stitch with a .25” seam allowance. (I pinned a few panels and then stitched, and then pinned a few panels and then stitched so that I wasn’t dealing with a piece too full of pins.) Press the seams to one side.
2. Measure your skirt in three sections across the ROYGBIV (so measure from the red to the violet in each of the three rainbow repeats). (Mine measured 20.5—should be the same as your “W” measurement from the worksheet but if it’s a bit off it’s no big deal as you’ll be gathering these sections—you just want to be sure the lining fits nicely.) Cut out three lining pieces the same dimensions as your ROYGBIV panels plus 1” for seam allowance. Stitch these three sections together allong the sides with a .5” seam allowance. Press seams open. Pin lining to skirt right sides together. Stitch with a .25” seam allowance on the sides and a .5” seam allowance along the bottom. Leave the top open. Clip corners. Turn right sides out and press.
Top stitch the skirt close along the sides and hem.
3. Cut the waistband: 3 pieces measuring W/2 + 1” and 5” high (see worksheet above). Sew the three pieces together at the short ends with a .5” seam allowance. Fold in half lengthwise and press to crease the center (which will be the top of the waistband). Press under one long edge .5”.
4. Cut the ties, 2 pieces 20” long and 5” high. Hem three sides of the ties but rolling under .25” twice and stitching. Baste across the raw edge and gather slightly.
6. Cut three pieces of fusible interfacing to fit within the waistband sections between the pressed edge and the crease for the top of the waistband (the half of the waistband that will be folded over to the inside). Press to fuse.
7. To attach the ties to the waistband, pin one tie on the waistband right front panel with right sides together and the raw edges aligned (so when the skirt is worn the bow is on the left side). Pin the tie within the bottom half of the waistband, below the horizontal crease. Then fold the waistband over the tie, right sides together, raw edges even. Stitch this short end of the waistband (the raw ends) with a .5” seam allowance. Clip corners.
Unpick the waistband seam joining the back waistband to the left front panel from the center crease to .25” above the waistband seam. Insert the other tie and put raw edges together, with the right side facing out. Pin and stitch the seam closed again securing the tie in the waistband. Trim seam.
Fold the waistband right sides together and pin together the raw edges of the left front panel. Stitch. Clip the corner.
8. Turn the waistband right side out. Pin the pressed edge of the waistband along the waistband. On the outside, topstitch or edgestitch the waistband close to the seam being careful not to catch the ties.
9. You’re almost finished! All that is left is a button and buttonhole to close the inside wrap of the skirt. Mark and sew a buttonhole on the end of the left front waistband, centered from top to bottom.
Sew a button opposite on the inside of the right front waistband. I sewed on the button through one layer of the waistband so no stitching shows on the outside.
Close, tie with a bow, and watch your little girl twirl and splash through the puddles in her rainbow skirt!


This is such a happy skirt! Lovin' that rainbow!!
ReplyDeleteI linked to your tutorial on Craft Gossip Sewing:
http://sewing.craftgossip.com/tutorial-rainbow-wrap-skirt/2011/05/23/
--Anne
Very lovely! What a wonderful skirt for summer.
ReplyDeleteWhat a beautiful skirt! You captured our series perfectly in this project. Thank you so much for being apart of Color My Summer!
ReplyDeleteI LOVE THIS! I'm "yelling" b/c I'm THAT excited! :) My daughter definitely needs one. I think I need one too but maybe a more muted version. :) Thanks so much for sharing this! Love the pictures too and I'm glad I'm not the only one dealing with rain. :)
ReplyDeleteOh it's gorgeous! It turned out really cute. Super summery, super cute :)
ReplyDeleteFabulous! thanks for the tutorial, it's on the to do list!
ReplyDeleteI absolutely love this skirt, so much fun. I am going to put it on my "to make" list.
ReplyDeletePS
and yes I remember those shirts!
oh my gosh..so cute, my 6 year old MUST have one...and she wants to know what brand your daughters shoes are too since they are "the coolest ever!" :)
ReplyDeleteoh wow i totally love this!!! I wish I could sew :( Love the sneakers too.
ReplyDeleteAudrey's shoes are Converse Chuck Taylor Stretch in Rainbow. I ordered them from Gilt Groupe so they may be last season's...they are pretty great!
ReplyDeleteSo pretty!
ReplyDelete~ Sarah
I love this! Your instructions are so clear and your pictures are wonderful. I had to share your link on my blog. http://pinksparkleandlace.blogspot.com/p/tutorials.html
ReplyDelete{Hope that is okay ~ gave you full credit}
Your parties & decorations are awesome. You are so creative!
~ Tammy {new follower}
I am so in love with this skirt! I'm definitely going to have to make this before my daughter's birthday (one month from today, yikes!) but I'm also seeing SOOO many possibilities, like all those lengths of Hallowe'en print fabrics I got for $0.25 a yard, or even plain-coloured ones for school. The choices, the choices! :) Thank you for the tutorial! :)
ReplyDeleteI want to make me one exactly like this! I love it! :D
ReplyDeleteI will definitely be making this skirt! Possibly matching ones for myself and my little cousin while we prance through Disneyland this fall! Can't WAIT!!
ReplyDeleteLoved this! I made it for my little Audrey! :) thank you for the tutorial. Great instructions!!
ReplyDeleteHello, I came via a link on Facebook, and was scrolling through your post on this beautiful skirt. What caught my eye though, is how neatly you finished the skirt, all hidden seams and no raw edges, very impressive attention to detail. I hope you don't mind that I Pinned this. Thank you.
ReplyDeleteAngela
I am in the middle of making the skirt and I am lost on 7 and beyond. I do not understand your directions. HELP!!
ReplyDelete@Anonymous: These next few steps are for attaching the ties to the waistband and finishing the waistband. It may be confusing because you turn the waistband inside out (right sides together) to stitch the ends, and then right side out and topstitch to finish it. I just made a few edits to the instructions in an effort to make this more clear. I hope that helps. If there is a specific phrase you don't understand please let me know by elaborating. Thanks.
ReplyDeleteThis is just what I needed for my daughter to wear at her rainbow themed 5th birthday party. What a nice and detailed pattern. Thank you, thank you, thank you!!!
ReplyDelete